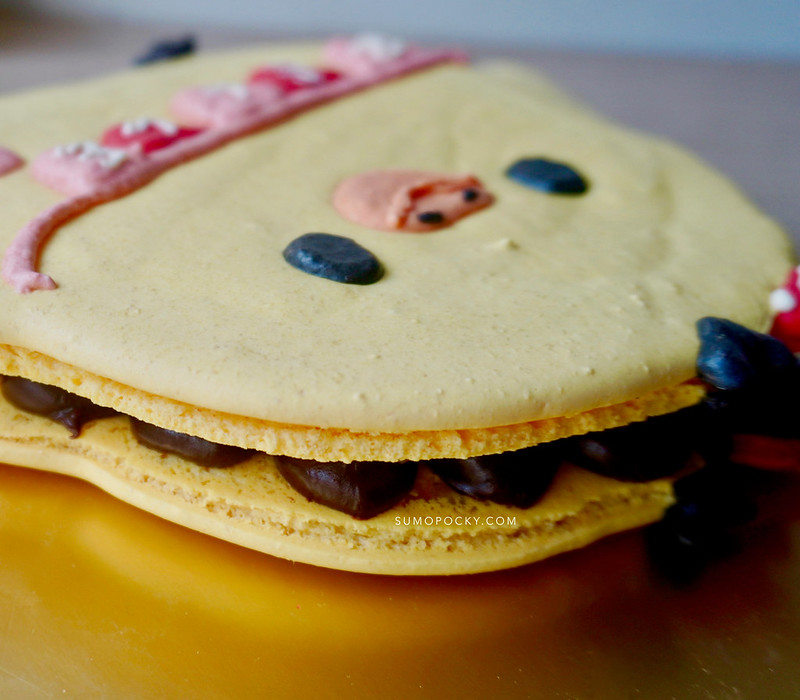
Kiiroitori Rilakkuma Macaron Cake
October 23, 2019
Here's a new macaron cake design that I baked - Kiiroitori from the Rilakkuma family. This Kiiroitori Macaron cake is for a little girl's 2 year old birthday. Thus I added some details like the Number 2 and her name 🥰
Who is Kiiroitori?
"Kiiroitori is a small, yellow bird often seen with Rilakkuma and Korilakkuma." source
"Kiiroitori used to stay in a birdcage, but can now leave it freely. Every day Kiiroitori scolds Rilakkuma for laying around and fights with playful Korilakkuma for being too mischievous."source

A tip for macaron cakes is to ensure that the shells are completely cooled before removing them from the baking paper. This is because the shells are so large and thus are more prone to baking when you remove them from the oven. Sometimes, I will even take the extra step of cooling the shells completely in the fridge first before handling with them.
If you are interested in baking this macaron cake, I shared a video tutorial on how to pipe the shells!
KIIROITORI RILAKKUMA MACARON CAKE RECIPE
by Sumopocky
Yield
1 Large Macaron Cake (and 1 macaron for decor)
Approximately 6.5 inch width x 6.5 inch length
Ingredients
[For Macaron Shells]
Meringue: 70g of Egg whites + 90g of Castor sugar
80g of Almond flour
80g of Powdered/icing sugar
Food colouring to get the batter colours in Step 4
[For Filling]
Click here to fill with your desired flavour!
Directions
[For Macaron Shells]
1. Make the meringue. In a bowl, beat the egg whites on low speed using an electric mixer until it is white and frothy (approximately 1 minute). Gradually add the sugar 1/4 at a time. When the first addition of sugar has completely dissolved (approximately 1 minute later), increase the mixer speed to medium and add until all the sugar has been incorporated. Continue to beat until stiff peaks form. [Basic Macaron Tutorial Video]
2. Sift the almond flour and icing sugar to the meringue.
3. Begin macaronage. Using a spatula, start the macaronage process by folding and lightly scraping the top of the batter. Continue till the ingredients just start to combine.
4. Then, split the batter and continue to macaronage process, until you get a molten-like mixture and drips down like a ribbon when lifted. Transfer to piping bags.
5. Pipe out batter onto parchment paper. You can make a template to ensure the shells match (remember to flip the image for the back shell!) Pipe on the other details with the relevant batter colours. Please watch my video for the full demonstration of how to pipe the shell.
6. Let the shells dry in a non humid place or in an air conditioned room. You should be able to touch it gently with the tip of your finger without it sticking.
7. Bake in a preheated oven at 150°C for approximately 25 minutes (keep an eye on the macaron shells, as it depends on your oven and size of the macaron). I placed an opaque oven tray on the top-most shelf in the oven to prevent my macarons from browning.
8. Let shells cool before removing from parchment paper. Then, pipe with filling and chill for at least 3 hours (best to leave overnight). Enjoy!

by Sumopocky
Yield
1 Large Macaron Cake (and 1 macaron for decor)
Approximately 6.5 inch width x 6.5 inch length
Ingredients
[For Macaron Shells]
Meringue: 70g of Egg whites + 90g of Castor sugar
80g of Almond flour
80g of Powdered/icing sugar
Food colouring to get the batter colours in Step 4
Click here to fill with your desired flavour!
Directions
[For Macaron Shells]
1. Make the meringue. In a bowl, beat the egg whites on low speed using an electric mixer until it is white and frothy (approximately 1 minute). Gradually add the sugar 1/4 at a time. When the first addition of sugar has completely dissolved (approximately 1 minute later), increase the mixer speed to medium and add until all the sugar has been incorporated. Continue to beat until stiff peaks form. [Basic Macaron Tutorial Video]
2. Sift the almond flour and icing sugar to the meringue.
3. Begin macaronage. Using a spatula, start the macaronage process by folding and lightly scraping the top of the batter. Continue till the ingredients just start to combine.
4. Then, split the batter and continue to macaronage process, until you get a molten-like mixture and drips down like a ribbon when lifted. Transfer to piping bags.
Colour of Batter
|
Portion
|
Piping Tip
|
White
Pink
Orange
Red
Black
Yellow
|
1 tsp
1 tbsp
2 tsp
1 tbsp
1 tbsp
Remaining batter
|
Small
Small
Small
Small
Small
Medium + Small
|
6. Let the shells dry in a non humid place or in an air conditioned room. You should be able to touch it gently with the tip of your finger without it sticking.
7. Bake in a preheated oven at 150°C for approximately 25 minutes (keep an eye on the macaron shells, as it depends on your oven and size of the macaron). I placed an opaque oven tray on the top-most shelf in the oven to prevent my macarons from browning.
8. Let shells cool before removing from parchment paper. Then, pipe with filling and chill for at least 3 hours (best to leave overnight). Enjoy!


0 comments