


Tsum Tsum Snow Skin Mooncakes: Pooh & Friends
September 13, 2015
Have you ever played the game, Tsum Tsum? I am far from being a gamer, and rarely even play games on my phone; But I was hooked the moment I scrolled pass Tsum Tsum on the app store and have not stopped playing since then. I must confess that my main reason for loving the game is extremely superficial - the truth is because the characters are SO CUTE. They look like potato versions of their characters. How does Disney manage to make their characters appear even cuter than they originally were?! And why am I always so susceptible to such cute marketing gimmicks? I even purchased a Mickey Tsum Tsum soft toy for my bedroom.
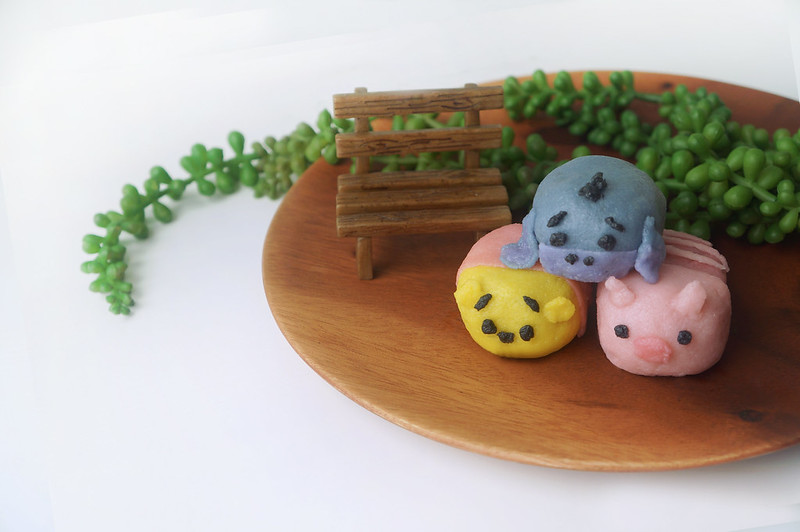
I guess by now you can comprehend the full magnitude of my obsession with Tsum Tsum. And with Mooncake festival around the corner, I was inspired to make snowskin Tsum Tsums! I prefer snowskin mooncakes over the traditional baked mooncakes because of its chewy exterior. You can purchase instant snowskin mix from your local baking supplies store. I purchased mine from Phoon Huat. They also sell instant lotus paste for the mooncake filling. If you prefer less sweetened desserts, go for the white lotus paste as there's less sugar added.
If you prefer the traditional mooncake look, you can always purchase the mooncake moulds. However, if you want something unique that no one else is selling in the market, then definitely try to make these Tsum Tsum mooncakes! They are sure to impress your relatives, friends or colleagues. The difficulty is in cutting them open to eat them cause they are so darn cute.
Tsum Tsum Snow Skin Mooncake Recipe with White Lotus Paste Filling:
Pooh & Friends
Pooh & Friends
Servings: 8 Tsum Tsum Mooncakes
Recipe adapted from Phoon Huat
INGREDIENTS
For Snow Skin
175g of Snow Skin Premix
70-75ml of Water
1/2 tsp of Pandan Flavouring
35g of Shortening
Blue, Pink, Purple, Yellow and Black Food colouring
INGREDIENTS
For Snow Skin
175g of Snow Skin Premix
70-75ml of Water
1/2 tsp of Pandan Flavouring
35g of Shortening
Blue, Pink, Purple, Yellow and Black Food colouring
For Mooncake Filling
150g of White Lotus Paste
50g of Pumpkin Seeds
150g of White Lotus Paste
50g of Pumpkin Seeds
DIRECTIONS
[For Snow Skin]
1. In a bowl, add water and pandan flavouring to the snow skin premix. Mix it in with your hands in a circular motion.
2. Knead the shortening into the dough.
3. Separate into 8 equal sized balls (approximately 25g each), and set it in the fridge. This will make the dough easier to work with. Remember to keep some dough for decorating the character's features.
[For Mooncake Filling]
1. Mix all ingredients until they are thoroughly combined.
2. Divide them into 25g balls. Roll them into an oval shape.
[For Mooncake Filling]
1. Mix all ingredients until they are thoroughly combined.
2. Divide them into 25g balls. Roll them into an oval shape.
[Putting them together]
1. Colour the snow skin to your desired colours. Example, for eeyore, you'll need blue, purple, black and pink. Watch my video above to learn how to decorate!
2. Roll out the snow skin dough into a flat disc.
3. Place the filling and wrap it with the snow skin. Pinch away any excess. Add decoration details.
4. Chill in the fridge before serving.
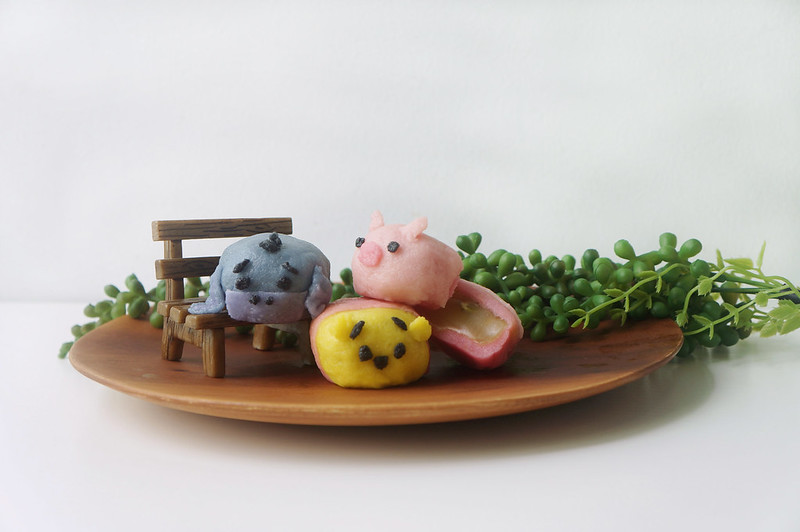
Cut piglet apart, whoops!


0 comments